
 GROWTH GUIDE
Online Booking Setup: A 15-Minute Path to Your First Live Page
You can have a working booking page live in the next 15 minutes: connected to your calendar, sending confirmations, and ready to take real appointments. That’s the outcome, and it’s a realistic one, not a marketing promise. A 15-minute quick-start path is exactly what most modern scheduling platforms are built around now.
Three things get you there fastest:
- Create your account and set your time zone and currency.
- Add one service with a duration and price.
- Publish the booking link and send it to yourself as a test.
Everything after that (payments, buffers, staff routing, reminders) is refinement you can layer on once bookings start coming in. The rest of this guide walks through that refinement in order: services and availability, payment and cancellation policy, calendar sync, embedding the link on your site, automated reminders, and a launch checklist that catches the mistakes most businesses make in week one.
Key Takeaways
A working online booking setup requires two-way calendar sync, a clear cancellation policy shown at booking, and an SMS-based reminder cadence to actually cut no-shows.
| Point | Details |
|---|---|
| Publish fast, refine later | Get one service live with basic hours first; add payments, buffers, and staff routing after testing. |
| Two-way sync is non-optional | Read-only calendar sync is the most common cause of double bookings for solo operators. |
| SMS beats email for reminders | Text reminders get opened faster than email, which meaningfully cuts no-show rates. |
| Policy text belongs at booking | Display your cancellation and deposit policy on the booking page itself, not just in a follow-up email. |
| Integrated visibility plus booking | Service Grower pairs SmartRequest booking with AnswerReady™ Websites so found and booked happen on one platform. |
Table of Contents
- How Do You Set Up Online Booking Step by Step?
- How Should You Configure Services, Staff, and Availability?
- What Payment and Cancellation Policies Should You Set?
- How Do Calendar Sync and Time Zones Affect Your Bookings?
- Should You Use a Hosted Booking Page or an Embedded Widget?
- What’s the Best Reminder Cadence to Reduce No-Shows?
- How Do You Test Your Booking Flow Before Launch?
- What Are the Most Common Online Booking Problems?
- Why an Integrated Booking and Visibility Approach Works Better
- What Setup Mistakes Do Businesses Make Most Often?
- Get Booking and Visibility Working Together With Service Grower
- Frequently Asked Questions
- Sources
How Do You Set Up Online Booking Step by Step?
Getting your online booking setup right the first time saves you from rebuilding it three weeks later. Most platforms follow the same rough sequence: create the account, lock in your business basics, add a service, set your hours, and publish. Skip a step and you’ll find yourself fielding phone calls asking “did my appointment actually book?”
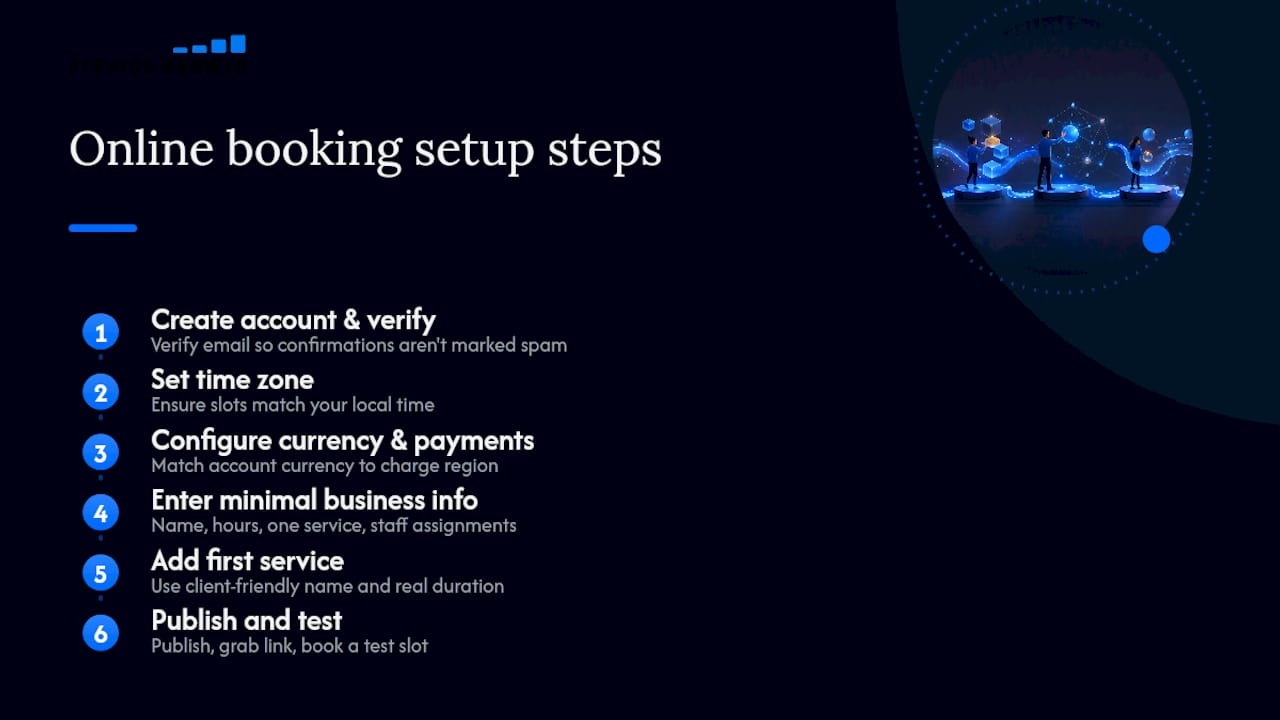
1. Create your account and verify your email. Every scheduling platform requires email verification before your booking page goes live. This isn’t bureaucracy. It’s what lets the system send confirmation emails from an address clients trust instead of one that lands in spam.
2. Set your time zone before you touch anything else. This single setting determines whether a 2 p.m. slot means 2 p.m. for you or 2 p.m. for someone three states away. Get it wrong at the start and you’ll spend the next month manually correcting bookings. Set it once, confirm it, move on.
3. Set your currency and payment region. If you plan to charge deposits or full payment at booking, your account’s currency setting has to match what you actually charge. This matters more than it sounds; a mismatch here is a common reason payments fail silently during testing.

4. Enter your minimum publishable business info. You need: your business name, your operating hours, at least one bookable service, and staff assignments if more than one person takes appointments. That’s the floor. You don’t need a logo, a bio, or a fully worded cancellation policy to go live. Google Calendar’s appointment schedule setup uses this same minimal approach: name the schedule, set the duration, set availability, publish.
5. Add your first service. Give it a name a client would recognize (not “Service A”) and a real duration. A 30-minute haircut should say 30 minutes, not 45 padded “just in case.” You’ll add buffers separately in the next stage of setup.
6. Set your availability window. Block out the hours you’re actually willing to take appointments; not your full working day if half of it is reserved for admin or existing clients. Most platforms let you set recurring weekly hours plus one-off exceptions for holidays or personal days.
7. Publish and grab your booking link. This is the step people hesitate on the longest, and it’s the one that matters least in terms of risk. A published page with one service and reasonable hours is infinitely more useful than a perfect page sitting in draft mode. You can edit almost everything after publishing.
8. Test it yourself before sharing it. Book a slot as if you were a client. Check that the confirmation email arrives, that the time zone reads correctly, and that the appointment shows up on your connected calendar.
Pro Tip: Publish with just one service first, even if you offer ten. A live page with one option beats a perfect page that’s still in draft three days later. Add the rest once you’ve confirmed the basics work.
Once your page is published, everything else, deposits, buffers, staff routing, is an edit, not a rebuild.
How Should You Configure Services, Staff, and Availability?
The technical setup is the easy part. The part that actually prevents chaos is how you model your services against real working time. Get this wrong and you’ll be double-booked by Thursday.
- Set duration to match reality, then add a buffer separately. If a haircut takes 30 minutes but you need 10 minutes to clean up and prep for the next client, don’t list the service as 40 minutes; list it as 30 with a 10-minute buffer. This keeps your calendar accurate if you ever need to report actual service time.
- Route services to the right staff member automatically. If you have more than one provider, assign services to specific people rather than leaving every slot open to anyone. Platforms like Doodle use routing forms and event types specifically so clients land on the right person’s calendar without a phone call to sort it out.
- Set capacity for anything that isn’t one-on-one. A group fitness class or a workshop needs a maximum headcount per slot, not just a duration. Missing this is how you end up with 14 people registered for a 10-person room.
- Define your real working hours, including the exceptions. Set your standard weekly availability, then block holidays, half-days, and personal time individually. A single missed exception is the most common reason for a booking that shouldn’t have existed.
- Cap your maximum daily bookings if back-to-back work exhausts you. Even if your calendar technically has room for 12 appointments, you might only want to take 8. Set that limit explicitly instead of hoping you’ll turn people down manually.
What Payment and Cancellation Policies Should You Set?
Deciding when to collect money is a business decision before it’s a technical one. If your average client is a reliable repeat customer, taking payment on-site at the appointment usually works fine. If you deal with first-time bookings, high-value services, or a history of no-shows, requiring a deposit or full payment at the time of booking protects your revenue and filters out people who weren’t serious anyway.
Before connecting a payment gateway like Stripe, Square, or PayPal, check a few things:
- Processing fees per transaction (they vary by card type and platform).
- How fast payouts actually hit your bank account.
- How disputes and chargebacks get handled, and who you contact when one happens.
Google Calendar’s appointment scheduling tools support direct Stripe integration for exactly this reason: collecting payment at booking removes the awkward “can you pay me now” conversation entirely.
Your cancellation policy needs to live on the booking page itself, not buried in a follow-up email. Something like: “Cancellations made less than 24 hours before your appointment will be charged 50% of the service fee” sets a clear expectation before anyone commits. Vendor guidance on booking setup consistently recommends surfacing this text at the point of booking and again in the confirmation email, not just in your terms of service page nobody reads.
Pro Tip: Word your no-show policy in terms of what the client gets, not just what they lose. “Reschedule free up to 24 hours before” reads friendlier than “no refunds after cancellation” and drives the same behavior.
How Do Calendar Sync and Time Zones Affect Your Bookings?
Two-way calendar sync is the single setting that prevents the most common scheduling disaster: someone booking a slot you’d already filled somewhere else. Read-only sync shows your busy times but doesn’t automatically block them off in the booking tool; two-way sync does both, which matters most if you’re a solo operator juggling a personal calendar and a business one.
- Choose two-way sync whenever you manage your own schedule. It updates both directions in real time, so a client appointment blocks your personal calendar and vice versa.
- Set your time zone to display automatically for the client’s browser location, especially if you serve remote clients or travel for work. A client booking from a different time zone should see times in their own zone, not yours.
- Set a minimum lead time, like 2 to 4 hours, to prevent someone from booking an appointment 10 minutes from now that you have no way to prepare for.
- Cap your maximum booking window (60 to 90 days out works for most service businesses) so your calendar doesn’t fill with speculative bookings from six months in the future.
Should You Use a Hosted Booking Page or an Embedded Widget?
This decision comes down to whether you already have a website worth sending people to. A hosted booking page is the faster route if you don’t have a site or yours is outdated. It works as a standalone link, needs no code, and you can share it anywhere: text messages, email signatures, social bios.
An embedded widget is the stronger option if your website already gets steady traffic. Square’s documentation on setting up online booking walks through both paths and confirms the core trade-off: a hosted page publishes instantly, while a widget keeps visitors on your own site instead of sending them somewhere else to finish booking. Embedding also tends to convert better for returning visitors who already trust your brand.
Whichever path you choose:
- Add a short welcome line above the calendar (“Book your first session in under a minute”) instead of leaving it blank.
- Ask only what you need in the intake form: name, phone, and one or two questions specific to the service (allergies for a spa treatment, vehicle type for an auto shop).
- Include a consent checkbox for any service involving health information or minors, since that’s a legal requirement in most states, not an optional nicety.
Placing your “Book” button where visitors actually look, homepage, service pages, and your contact page, tends to outperform burying it in a footer link nobody scrolls to.
What’s the Best Reminder Cadence to Reduce No-Shows?
A single confirmation email at the time of booking isn’t enough to stop no-shows. The cadence that actually works, and the one most scheduling platforms recommend by default, looks like this:
- Immediate confirmation at the moment of booking, by email, with the service, date, time, and a reschedule link.
- A 48-hour reminder, ideally by SMS since text messages get opened far faster than email.
- A 24-hour reminder, again by SMS, repeating the essentials and any prep instructions specific to the service.
- A same-day note two to three hours before the appointment as a final nudge.
SMS reminders reduce no-shows more reliably than email alone, largely because texts get read within minutes while emails sit unopened for hours. Keep at least one email confirmation in the mix for your own recordkeeping, but lean on text for anything time-sensitive.
Pro Tip: Include a one-line prep note in your 24-hour reminder if the service needs it, like “please arrive with clean, dry hair” for a color appointment. It cuts down on awkward surprises at check-in.
How Do You Test Your Booking Flow Before Launch?
Don’t send your link out publicly until you’ve run it through this sequence yourself:
- Book a test appointment as if you were a first-time client, using an email address you can check.
- Confirm the appointment appears correctly on your connected calendar, at the right time, in the right time zone.
- Verify the confirmation email and any SMS reminder actually arrive.
- Run a real payment through your test booking, then process a refund, to confirm both directions of your payment gateway work.
- Open the booking page on a phone, not just a desktop browser, since most clients will book from mobile.
- If you’re using an embedded widget, check that it displays properly on the actual page it’s embedded on, not just in isolation.
Pick one low-stakes day to treat as a soft launch: share the link with a few regulars first, watch for anything that breaks, and fix it before the link goes on your homepage or your social bios.
What Are the Most Common Online Booking Problems?
- Double bookings usually trace back to read-only calendar sync instead of two-way. Switch it, and confirm your existing calendar entries actually blocked the new slots.
- Time zone mismatches almost always come from a setting made during account creation and never revisited. Check it under account settings, not booking settings.
- Missing notifications are often a sender-verification issue, not a bug. Confirm your sending email is verified and check whether client confirmations are landing in spam.
- Failed payments frequently trace back to a currency mismatch between your account settings and what you’re actually charging. Recheck both against each other.
- Unassigned staff bookings happen when a service isn’t explicitly routed to a person. Go back and confirm every service has an owner.
Why an Integrated Booking and Visibility Approach Works Better
Getting bookings is only half the equation if clients can’t find you to book in the first place. Service Grower pairs AnswerReady™ Websites with SmartRequest, its booking and request tool, so the same platform that gets your business surfacing in Google and AI search results also handles the appointment itself.
- No disconnect between “found you online” and “actually booked.”
- One dashboard instead of juggling a scheduling tool, a review manager, and a separate analytics platform.
- Reviews and booking activity feed the same visibility engine instead of sitting in silos.
Clients report meaningful jumps in booking volume once visibility and scheduling stop operating as two separate systems.
A DIY scheduler works fine if your main challenge is organizing appointments you’re already getting. It won’t fix the deeper problem of not showing up when someone searches for your service in the first place. That’s where a managed, integrated approach earns its cost.
What Setup Mistakes Do Businesses Make Most Often?
The same three mistakes show up again and again. No buffer time between appointments, so one late client cascades into a fully backed-up afternoon. Reminders set to email only, when a same-day SMS would have caught the client before they forgot. And a booking link that gets published but never actually shared anywhere visible, so it sits live and unused.
Each fix takes minutes: add a 10-minute buffer, turn on SMS reminders, and put the link in your email signature and Instagram bio today. Try those three changes this week and see what shifts.
Get Booking and Visibility Working Together With Service Grower
Service Grower is the option for business owners who don’t want to manage a scheduler, a review dashboard, and a search visibility strategy as three separate headaches. Instead of bolting a booking widget onto a site that AI search tools and Google struggle to find, Service Grower builds the two together from the start.
SmartRequest handles the booking and request side you just read about: services, availability, payments, reminders. AnswerReady™ Websites makes sure your business actually surfaces when someone searches for what you offer nearby, so the booking page has traffic to convert in the first place. GrowthView then shows you which of that traffic is turning into actual appointments, instead of leaving you guessing. A standalone scheduler can take bookings, but it can’t get you found. That gap is exactly what an integrated setup closes.
If you’d rather have this set up for you than build it piece by piece, book a 15-minute call and walk through what an integrated setup would look like for your business.
Frequently Asked Questions
How long does online booking setup actually take? A basic page with one service, set hours, and a published link takes about 15 minutes. Adding payment gateways, staff routing, and a full reminder sequence typically adds another hour or two spread across your first week live.
Do I need a website to accept bookings online? No. A hosted booking page works as a standalone link you can share by text, email, or social media, with no website required. If you already have a site with steady traffic, an embedded widget usually converts better.
What’s the minimum I need to publish a booking page? A business name, your operating hours, and one bookable service with a set duration. Everything else, payments, policies, staff assignments, can be added after you’ve gone live.
How do I stop double bookings once I’m live? Switch from read-only to two-way calendar sync so your booking tool and personal calendar update each other automatically. That single change resolves the majority of double-booking complaints.
Should I require payment at booking or let clients pay on-site? If you deal with frequent no-shows or high-value services, require a deposit or full payment at booking. For loyal repeat clients, on-site payment usually works fine without adding friction.
Sources
- Create an appointment schedule - Google Calendar Help
- Setting Up Online Booking in 15 Minutes: Step-by-Step Guide - FullyBooked
- Set up online booking | Square Support Center - United States